
Assembly Instructions for SolarBit
Assembly Instructions for SolarBit
Important Notes
- Until SolarBit is fully assembled, lift the device carefully from the bottom. The housing is sturdy and can be temporarily placed on the protruding screws.
- All directional references are from the back (fan side) of the device.
- Handle the LDR, cables, and door with care to avoid damage.
- After assembly, ensure all components are securely mounted and the device is stable.
- For Wi-Fi connection or IP address issues, refer to the manufacturer’s documentation.
Step-by-Step Instructions
- Mounting the Feet
- Remove the four wing nuts securing the four feet.
- Attach the four identical feet to the underside of the housing. The order does not matter.
- Place the device on the mounted feet in an area with sufficient space.
- Preparing the Solar Panels
- Connect the two aluminum profiles using the connectors inside the profiles.
- Mount the four orange panel holders to the solar panels using the provided screws and nuts.
- Removing the Top Cover
- Carefully remove the top cover (it is loosely placed).
- Take care with the LDR (light sensor), wrapped in bubble wrap and hanging from its cable. Caution: Glass, fragile!
- Installing the Aluminum Profile and Aligning the LDR
- Check the slot in the upper gearbox to ensure the openings align properly. If necessary, gently adjust the silver left part (which activates the limit switches) by hand to align it.
- Align the LDR correctly before sliding it onto the profile. The black component on the LDR PCB should be facing towards the back of the device (fan side).
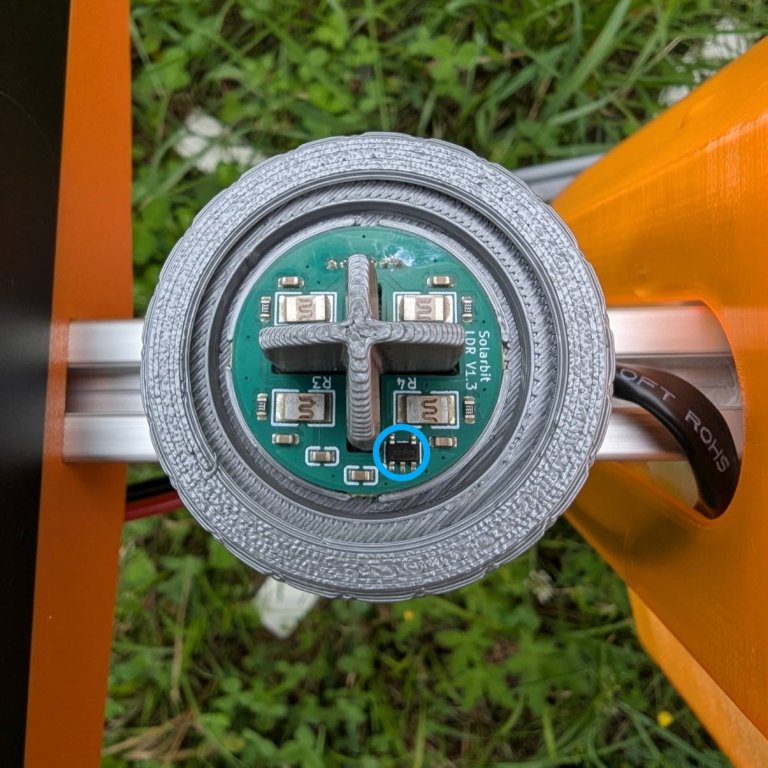
- Slide the aluminum profile (side without connectors facing up) carefully from right to left through the slot in the upper gearbox.
- Once the profile emerges on the other side, slide the LDR onto it. Place the LDR cable into the slot of the aluminum profile.
- Center the aluminum profile so there is approximately equal space on both sides.
- Slide the two solar panels onto the aluminum profile and secure them with screws.
- Opening the Housing
- Open the SolarBit housing by removing the 5 screws and carefully detaching the door.
- Place the door safely aside. Ensure the cables connecting the door to the SolarBit PCB are not damaged or disconnected.
- Installing the Wi-Fi Antenna
- Screw the Wi-Fi antenna onto the brass fitting protruding from the rear left side of the housing.
- Connecting the Battery
- Use the recommended battery (see https://amzn.to/3UmTCEu) or a battery with identical specifications.
- Connect the battery to the two cables with flat battery connectors: first the black, then the red contact.
- Place the battery in the designated slot at the rear right of the housing.
- Connecting the Solar Cables
- Connect the MC4 connectors of the solar panels to the solar cables protruding from the top of the back of the device.
- Stow any excess cable under the aluminum profile, ensuring enough slack for panel movement.
- Reattaching the Door
- Reattach the door, ensuring the cables are not damaged during the process.
- Powering On
- Turn on SolarBit using the large power button on the door.
- SolarBit will attempt to connect to a Wi-Fi network. If no known network is found, it will create a configuration Wi-Fi named “SolarBit_Config” with the default password solarbit123 after a few seconds.
- Connect to this Wi-Fi and enter the desired SSID and password of your network in the provided interface.
- After configuration, SolarBit will restart.
- Finding the IP Address
- Determine SolarBit’s IP address using software like AngryIP Scanner or your router’s settings. The device’s hostname is ESP32S3xyzxyzxyz.
- Enter the IP address in a browser to access the SolarBit OS web interface, where various settings can be configured.
- Verifying Limit Switches and Activating Autotracking
- In the SolarBit OS web interface, navigate to the “Controls” tab and set the device to manual tracking before proceeding.
- Check the status of the four limit switches in the “Controls” tab.
- Manually press each limit switch by hand and verify that the status light in the web interface turns green when pressed.
- Use the “Controls” tab to manually move the gearboxes by 10 or 20 steps at a time until the limit switches are mechanically triggered by the installed limit switch triggers.
- Do not activate autotracking until all limit switches are confirmed to work correctly. This was checked before shipping, but cables may have loosened during transport, so rechecking is recommended.
- Once the limit switches are verified and the LDR is correctly mounted and oriented, you can activate autotracking. Ensure you step back from the SolarBit and confirm it has ample room to move without colliding with its surroundings.
- Setting Up the Wi-Fi Bridge (Optional)
- If your miner experiences Wi-Fi connection issues due to distance, set up the Wi-Fi bridge in the SolarBit OS web interface to improve connectivity.
Done! Your SolarBit is now fully assembled and ready for use.
When you place your SolarBit on its desired position, make sure to orient the device in a way, so the big “S” on the front of the enclosure is facing south!
Contact us for further assistance if needed.